You might have seen some websites with a progress bar at the top of the page that changes as you keep scrolling, indicating the (approximate) position you are on the page. We are going to see how to add such an indicator to the Startup template.
Adding the Progress Indicator to the Page
To get started, add the following markup to the index.html file right after the opening <body> tag.
<div class="progress-container fixed-top">
  <span class="progress-bar"></span>
</div>
fixed-top is a Bootstrap utility class that adds the following CSS styling to an element.
.fixed-top {
  position: fixed;
  top: 0;
  right: 0;
  left: 0;
  z-index: $zindex-fixed;
}
With that, the Progress Indicator will stay on top of the web page, even when the user scrolls.
Styling the Progress Indicator
Let’s add some additional styling to the indicator.
First, find the link to the css/style.min.css CSS file in index.html and remove min from it.
<link href="css/style.css" rel="stylesheet" />
Then add the following to the css/style.css file.
.progress-container {
  width: 100%;
  background-color: transparent;
  height: 5px;
  display: block;
}
.progress-bar {
  background-color: red;
  width: 0%;
  display: block;
  height: inherit;
}
We place the Indicator inside a transparent container that takes up the whole width of the window. The Indicator itself is red and starts off with a width of 0. As the user scrolls down the page, we’ll calculate the scroll position with JavaScript and update the Indicator’s width accordingly.
Making It Work
Next, add the following function to the bottom of the js/script.js file. We’ll cover what it does shortly.
function scrollProgressBar() {
  var getMax = function () {
    return $(document).height() - $(window).height();
  };

  var getValue = function () {
    return $(window).scrollTop();
  };

  var progressBar = $(".progress-bar"),
    max = getMax(),
    value,
    width;

  var getWidth = function () {
    // Calculate width in percentage
    value = getValue();
    width = (value / max) * 100;
    width = width + "%";
    return width;
  };

  var setWidth = function () {
    progressBar.css({ width: getWidth() });
  };

  $(document).on("scroll", setWidth);
  $(window).on("resize", function () {
    // Need to reset max
    max = getMax();
    setWidth();
  });
}
Then call the function in the handler passed to the ready() function.
$(document).ready(function () {
  SF_scripts();

  scrollProgressBar();
});
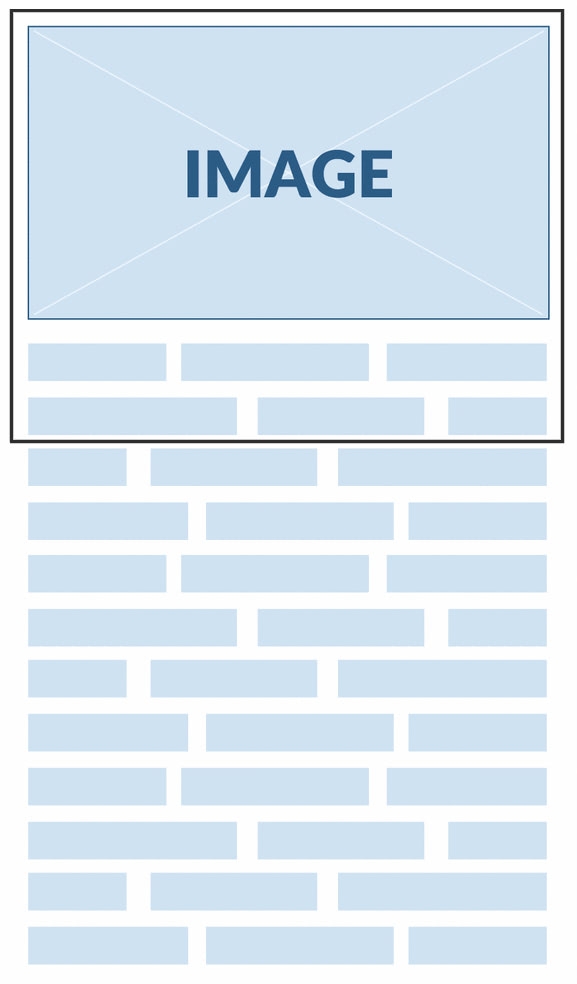
To better understand the code, let’s look at a visual representation of a webpage viewed on a browser.

In the image above, the black rectangle represents the viewport (the visible portion of the webpage). When the page is first loaded, the viewport displays the top of the page. At this point, we shouldn’t see the Progress Indicator because its width starts out at 0. If the length of the page’s content doesn’t go beyond the viewport, the page will not be scrollable and the width of the Progress Indicator will remain at 0. If the page’s length goes beyond the viewport, then the page will be scrollable and we will need to calculate the width of the Progress Indicator according to the scroll position.
To calculate the width of the Progress Indicator, we need to know two things:
- How much the page needs to be scrolled to reach its end. This is the portion of the page that is hidden below the viewport. It begins where the viewport ends and ends at the bottom of the page. In our code, we use
maxto store the value. We calculate it by subtracting the window’s height from the height of the document. - How much of the page has already been scrolled through. This will be the portion of the page that will be above the viewport as the user scrolls through the page. It will start at the top of the page and end where the viewport begins. Initially, its value will be
0and when the user starts scrolling, we’ll get its value by calculating the vertical offset of the top of the document from the top of the window. We use$(window).scrollTop()to get this. An element’sscrollTopvalue is a measurement of the distance from the element’s top to its topmost visible content. In the code, we store this in thevaluevariable.
With these two values, we calculate the width of the Progress Indicator in getWidth() and update its CSS rule in setWidth(). We attach this to the scroll event so that as the user scrolls through the page, the width of the Progress Indicator keeps on getting updated.
When the browser is resized, the height of the window and the document changes. This means that max and value have to be recalculated to reflect the correct position of the Indicator. We bind the code that recalculates these to the resize event handler.
If you take a look at your page in a browser, you should see the Progress Indicator as you scroll through the page. It also works when seen on smaller mobile views.
